Mods can entirely change a familiar game situation or play experience. Great mods can become a sensation, but even minor ones can enrich your gameplay experience. The mod function is a toolbox and what you do with it depends entirely on the creativity of the community, yourself included!
Mods supported by FINAL FANTASY XV WINDOWS EDITION include model mods, weapon mods, and costume mods. It is not difficult to create any of them, but depending on what goal you set for yourself, it may be quite challenging.
FINAL FANTASY XV WINDOWS EDITION MOD ORGANIZER converts assets you've created into mods and can upload them to the Steam Workshop. (The use of these functions are based on the premise that you have general knowledge about computer graphics and FBX model production skills.)
There is a world of possibilities opening up!
| Mod Types |
What you can do |
Main Data Required |
| Model Mod |
Replace existing character model |
Model, texture |
| Weapon Mod |
Add new weapon |
Model, texture |
| Outfit Mod |
Add new costume |
Model, texture |
Model Mods
Model Mods replace character model data with data you create.
A character model requires a set of digital data including coordinates and image data which is necessary to draw 3D computer graphics. A character's still model will be generated based on the data you provide, changing the appearance of the character in game. You are only limited by your creativity.
Model Mods do not change any other elements apart from appearance. They do not change the game functionality, rules or algorithms such as character movement (motion, animation) or combat.
Switch a monolith model
Let us assume that we have a simple cuboid model as follows.
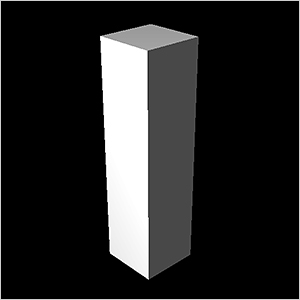
Cuboid Model
This is a very simple polygon mesh with 6 surfaces, 12 triangles (polygons), but it is an example of a Model Mod that can be used to replace an original character model.
You cannot create a Model Mod using MOD ORGANIZER. A Model Mod can be created using third party DCC (Digital Content Creation) tool that can build 3D models.
The created model using a DCC tool can be exported as a Model Mod file using the MOD ORGANIZER which can then be read by and replaced within the game as shown below.
Replacing with a Cuboid Model
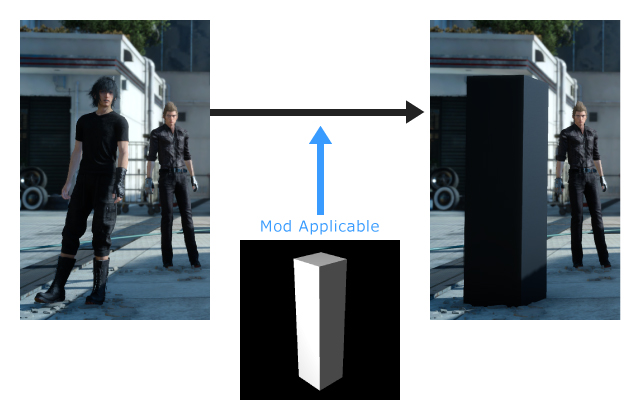
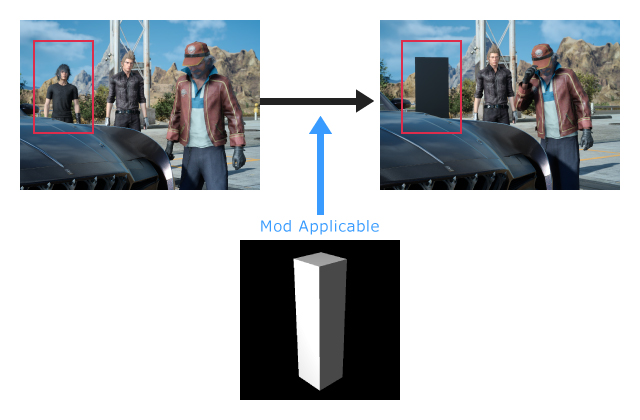
In this way, the appearance of the character in the game has been replaced by a monolith model.
We used a simple model here as an example, but you can add detailed settings. For example, to define the texture, you can specify the material for the polygon mesh, and for vertices there are provisions for normal vectors and texture coordinates (UV mapping).
In general, the material consists of parameters that define the optical properties of the model's surface, texture reference information, etc. The shader program draws using this information. Even a simple monolith as per like in the example may have a smooth texture or shadow depending on the material used. The creative work up to this point has been performed automatically by the DCC tool and depending on the environment, some actions may need to be done manually. Not all of the material’s parameters are defined within the FBX file format, but many are used to draw models in-game.
Note that a cuboid shape cannot be animated to move like a character, even if there is no issue with the type of material it is composed of. You will first need to add details such as limbs and a head.
Next, add joints and bones to bend and extend parts of the body, and create a skeleton required by the game program. In order to make the skeleton move, you need to specify which parts are the bones and how they are connected.
It is also necessary to add weights to the vertices of the polygon mesh.
After all the above is completed, a skinned animation will be generated in-game where skin moves in accordance with skeletal movement (motion).
In addition for the game to work various animation data and animation start conditions are needed, but for starters, the original data provided within the game code can suffice.
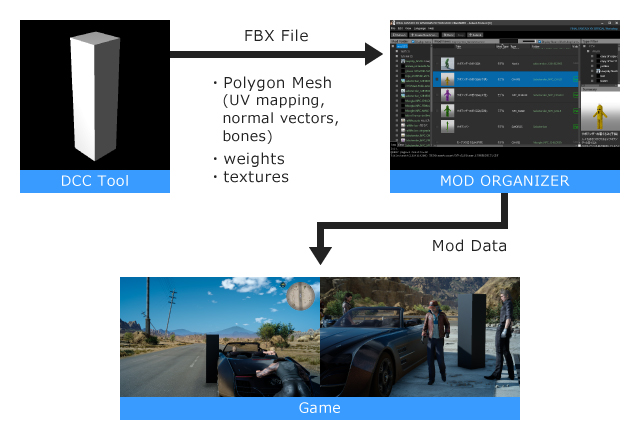
The character model replacement process is illustrated below.
After creating a model with a DCC tool and outputting it as an FBX file, it will be converted as mod data by the MOD ORGANIZER and read by the game.
Model Mod Data Flow
In the previous section, we introduced the replacement process for a single character model, but of course it can be performed for more than one character.
If you expand the selection range of the target characters with MOD ORGANIZER, you can, for example, change all NPCs to Cactuars like in the official mod sample.
It is also, it is possible to swap some weapons as well as characters. In the official mod sample, we have converted all one-handed swords to Cactuar sticks.
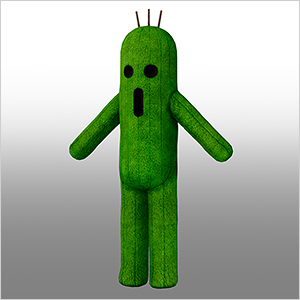
Cactuar Mod
The game loads data from the model mod file at start-up, until you change it in the game's mod menu. You cannot return to the original model during a game event or dynamically change to another model.
Weapon Mod
You can add new weapons with Weapon Mods.
They allow you not only to replace existing in-game weapons, but add new ones as well. Besides altering appearance, you can also set parameters such as weapon power.
Weapon parameters are entered in the MOD ORGANIZER Properties window. Certain restrictions are placed on what parameters you can set in order to maintain in-game balance.
Basically, you have a total of 100 points to distribute to define a weapon's abilities/performance. This system ensures that they are balanced against other weapons.
Further, this mod type is different for the main story mode and other play modes (online play etc.).
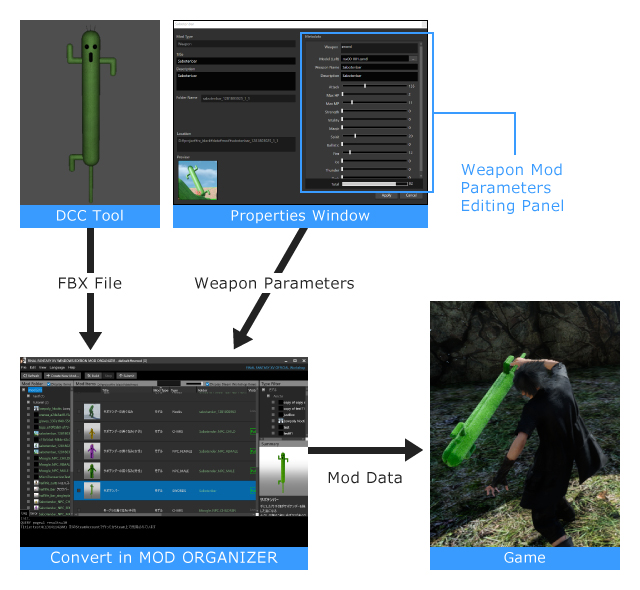
The Cactuar stick as a weapon comprises the weapon's FBX model and weapon parameters. Furthermore, even although it is a weapon, it still uses model data, so Model Mod Cactuar Stick can also be present as a public resource. This is a mod that makes a one-handed sword look like a Cactuar. It is very similar to a weapon mod, but there are some differences, explained below.
|
Add as a new weapon? |
Simple model replacement? |
How does a player use subscribed mod? |
| Weapon Mod |
YES |
NO |
Equip a weapon |
| Model mod for a weapon |
NO |
YES |
No need to do anything |
Outfit Mod
Costume mods can be used to add original costumes as new items as in the same way as weapons mods. The workflow is similar to a weapon mod. Costumes will be available in the item screens and equipment screens in the game.
Further, this mod type is different for the main story mode and other play modes.
To create mods, it is necessary to prepare 3D model data.
MOD ORGANIZER does not have the functionality to create DCC tool models. MOD ORGANIZER is not an all-in-one integrated environment type, but provides functions such as converting mod data and uploading to the Steam Workshop of FINAL FANTASY XV WINDOWS EDITION.
If you prepare 3D model data using your existing DCC tool, you can export it as an FBX file and import using the MOD ORGANIZER.
Model Creation Guidelines
- ・ Models are created as FBX files. An FBX file is a 3D data format, and it is possible to replace various information such as model, bone, material, light, camera, etc. However, the MOD ORGANIZER handles models, bones, and materials.
- ・ Model scaling is 1 unit = 1 cm.
- ・ Models use a right-handed coordinate system with the positive direction of the Y-axis being up and the positive direction of the Z-axis being forward.
- ・ The origin of the axis is the middle point between the left and right soles of a regular character model.
- ・ It is not necessary divide all model polygons into triangles.
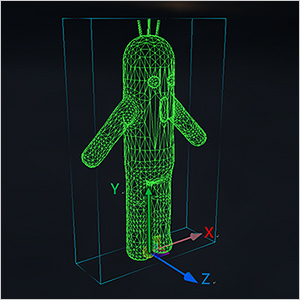
Coordinates
Character Skeleton Model
To animate a character model, you need to place joints and define bones.
Joints and bones are hierarchically structured and are called skeletons or bone structures. The animation program will animate a character based on the specified skeleton joint nodes.
Weight data for each bone lists vertices on the polygon mesh to which weights are applied. It is possible to display a model without adding bones.
Character Skeleton Model (Upper Torso)
The node names and connection order for joints that comprise a skeleton from waist to head in a character are shown in the table below.
Waist - Head Joint Node Names (connection order from waist)
| Position |
Node Name |
| Wrist |
C_Hip |
| Spine |
C_Spine1
C_Spine2
C_Spine3 |
| Neck |
C_Neck1 |
| Head |
C_Head |
| Top of Head |
C_HeadEnd |
The node names and connection order from shoulders to hands that comprise a skeleton in a character are shown in the table below.
Shoulders - Hands Joint Node Names (connection order from waist)
| Position |
Node Name (Left) |
Node Name (Right) |
| Wrist |
C_Hip |
| Spine |
C_Spine1
C_Spine2
C_Spine3 |
| Shoulder |
L_Shoulder |
R_Shoulder |
| Upper Arm |
L_UpperArm |
R_UpperArm |
| Forearm |
L_Forearm |
R_Forearm |
| Wrist |
L_Hand |
R_Hand |
| Hand Socket (holding something) |
L_Socket |
R_Socket |
Character Skeleton Model (Hand)
The node names and connection order for joints that comprise a hand bone structure in a character are shown in the table below.
Thumb
| Position |
Node Name (Left) |
Node Name (Right) |
| Wrist |
L_Hand |
R_Hand |
| Thumb |
L_Thumb1
L_Thumb2
L_Thumb3 |
R_Thumb1
R_Thumb2
R_Thumb3 |
| Thumb Tip |
L_ThumbEnd |
R_ThumbEnd |
Index Finger
| Position |
Node Name (Left) |
Node Name (Right) |
| Wrist |
L_Hand |
R_Hand |
| Index Finger |
L_Index1
L_Index2
L_Index3 |
R_Index1
R_Index2
R_Index3 |
| Index Finger Tip |
L_IndexEnd |
R_IndexEnd |
Middle Finger
| Position |
Node Name (Left) |
Node Name (Right) |
| Wrist |
L_Hand |
R_Hand |
| Middle Finger |
L_Middle1
L_Middle2
L_Middle3 |
R_Middle1
R_Middle2
R_Middle3 |
| Middle Finger Tip |
L_MiddleEnd |
R_MiddleEnd |
Ring Finger
| Position |
Node Name (Left) |
Node Name (Right) |
| Wrist |
L_Hand |
R_Hand |
| Ring Finger Metacarpal |
L_RingMeta |
R_RingMeta |
| Ring Finger |
L_Ring1
L_Ring2
L_Ring3 |
R_Ring1
R_Ring2
R_Ring3 |
| Ring Finger Tip |
L_RingEnd |
R_RingEnd |
Little Finger
| Position |
Node Name (Left) |
Node Name (Right) |
| Wrist |
L_Hand |
R_Hand |
| Little Finger Metacarpal |
L_PinkyMeta |
R_PinkyMeta |
| Little Finger |
L_Pinky1
L_Pinky2
L_Pinky3 |
R_Pinky1
R_Pinky2
R_Pinky3 |
| Little Finger Tip |
L_PinkyEnd |
R_PinkyEnd |
Character Skeleton Model (Legs)
The node names and connection order for joints that comprise a skeleton from the lower torso, hips-legs to toes in a character are shown in the table below.
Hips-Legs-Feet Node Names
| Position |
Node Name (Left) |
Node Name (Right) |
| Wrist |
C_Hip |
| Thigh |
L_UpperLeg |
R_UpperLeg |
| Shin |
L_Foreleg |
R_Foreleg |
| Ankle |
L_Foot |
R_Foot |
| Toe |
L_Toe |
R_Toe |
| Toe Tip |
L_ToeEnd |
R_ToeEnd |
In the case of animals, toe skeleton may be unnecessary (it is not included in Cactuars).
The node names of the toe joints are as below.
| Position |
Node Name (Left) |
Node Name (Right) |
| Big Toe Metatarsal |
L_ToeThumbMeta |
R_ToeThumbMeta |
| Big Toe |
L_ToeThumb1
L_ToeThumb2
L_ToeThumb3 |
R_ToeThumb1
R_ToeThumb2
R_ToeThumb3 |
| Big Toe Tip |
L_ToeThumbEnd |
R_ToeThumbEnd |
| Position |
Node Name (Left) |
Node Name (Right) |
| Second Toe Metatarsal |
L_ToeIndexMeta |
R_ToeIndexMeta |
| Second Toe |
L_ToeIndex1
L_ToeIndex2
L_ToeIndex3 |
R_ToeIndex1
R_ToeIndex2
R_ToeIndex3 |
| Second Toe Tip |
L_ToeIndexEnd |
R_ToeIndexEnd |
| Position |
Node Name (Left) |
Node Name (Right) |
| Middle Toe Metatarsal |
L_ToeMiddleMeta |
R_ToeMiddleMeta |
| Middle Toe |
L_ToeMiddle1
L_ToeMiddle2
L_ToeMiddle3 |
R_ToeMiddle1
R_ToeMiddle2
R_ToeMiddle3 |
| Middle Toe Tip |
L_ToeMiddleEnd |
R_ToeMiddleEnd |
| Position |
Node Name (Left) |
Node Name (Right) |
| Fourth Toe Metatarsal |
L_ToeRingMeta |
R_ToeRingMeta |
| Fourth Toe |
L_ToeRing1
L_ToeRing2
L_ToeRing3 |
R_ToeRing1
R_ToeRing2
R_ToeRing3 |
| Fourth Toe Tip |
L_ToeRingEnd |
R_ToeRingEnd |
| Position |
Node Name (Left) |
Node Name (Right) |
| Little Toe Metatarsal |
L_ToePinkyMeta |
R_ToePinkyMeta |
| Little Toe |
L_ToePinky1
L_ToePinky2
L_ToePinky3 |
R_ToePinky1
R_ToePinky2
R_ToePinky3 |
| Little Toe Tip |
L_ToePinkyEnd |
R_ToePinkyEnd |
The directions of the bones are as follows.
- ・ Sets the X axis on the main axis of the bone
- ・ Sets the Y axis to face the outside of the body
After placing a bone, you will need to adjust the skinning weight, set the joint positioning, and continue general adjustment of the 3D computer graphics. The work is done in the DCC tool.
Weapon Model Skeleton
In order for a character to hold a weapon model properly in its hands, you will need to include bones.
- ・ Add a bone in the gripping position under C_Body
- ・ Sets the X axis on the main axis of the bone
- ・ Sets the Y axis to face the -Z direction
- ・ The weapon model direction will have +Z as the front and -Z as the back
Other Asset Elements
| Element |
Remarks |
| Model |
Supports FBX ASCII/binary format. |
| Material |
Conforms to material specifications for FBX. However, not all material parameters are reflected in the drawing.
The specified material parameters are interpreted and rendered as appropriate by the in-game mod shader. The mod shader supports a wide range of materials and draws according to a standard lighting model.
It does not support special expressions. Also, some specified material parameters may not be reflected. |
| Shader |
In-game mod shader will be used. |
| Texture |
Common texture formats such as 24 bit TIFF LZW compression, 24 bit PNG, etc. are supported, but some file formats and color configurations may be incompatible.
Color maps, specular maps, normal maps etc. are supported as per FBX specifications.
An error will occur when converting from unsupported formats. |
- ・ Uppercase and lowercase letters, underscores, and numbers can be used in file names.
- ・ The FBX converter part of MOD ORGANIZER supports FBX LOD Group. LOD (Level of Detail) improves the rendering performance by switching the detail level of the model according to the distance between the model and the camera in a scene.
- ・ The back of a polygon is necessary in a scene where the reverse is visible.
Launching MOD ORGANIZER
*When using MOD ORGANIZER for Steam
Search and run FINAL FANTASY XV WINDOWS EDITION MOD ORGANIZER from the Steam client.
*When using MOD ORGANIZER installer
Search and run FINAL FANTASY XV WINDOWS EDITION MOD ORGANIZER from the Start menu.
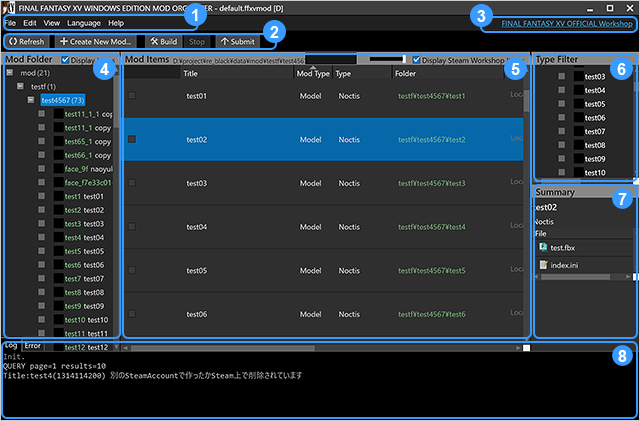
MOD ORGANIZER Screen
The following main window will be displayed when you launch MOD ORGANIZER.
The main menu is divided into several panels and sections. Their functions are explained below.
❶ Menu Bar
The following menus are available: This is an explanation of the main menu options.
| Menu |
Sub-menu |
Explanation |
| File |
New Project |
Starts a new project. Enter the project name and specify location when prompted. |
| Open Project |
Opens a different project. MOD ORGANIZER opens the last project by default. Use this option to switch to a different one. You will be prompted to select a ffxvmod file to load. |
| Close |
MOD ORGANIZER will now close. |
| Edit |
Select All |
Selects all listed items. You can also use the Ctrl+A shortcut. |
| Import Mod |
Use this when you want to use a working mod folder created in another environment.
Copy the mod folder you want to import into the project folder. Next, open this menu and select the index.ini file in the mod folder to import the mod into the current project. |
| Display |
Display |
Refreshes all listed items. You can also use the F5 key shortcut. |
| Language |
Language |
Change language. English, Japanese, and Chinese (simplified characters) are supported. |
| Help |
Help |
Opens the help website. |
| License Agreement |
View the license agreement (EULA). |
| About MOD ORGANIZER |
View MOD ORGANIZER version information. |
❷ Toolbars
The following toolbars are available:
| Toolbars |
Explanation |
| Display |
Updates list. You can also update with the F5 key.
If you delete a mod in the Steam Workshop, you may need to synchronize. |
| New Mod |
Creates a new mod. Click to start the creation wizard and follow instructions to make a new mod. |
| Build |
Builds the selected mod. Multiple mods can be selected and built all at once. |
| Suspend |
Suspends builds in progress. |
| Submit |
Submits a selected mod to the Steam Workshop. Multiple mods can be submitted at once except when submitting them for the first time.
You can include release notes listing any changes in the mod.
*Feature of MOD ORGANIZER for Steam. |
❸ Workshop Link*Feature of MOD ORGANIZER for Steam.
Click to open the Steam Workshop website for FINAL FANTASY XV WINDOWS EDITION linked to the currently logged in Steam account in your default web browser. The name of the Steam account you are logged into will appear here. Log into your Steam account using the Steam client.
If you are not logged into your Steam account, nothing will be displayed here.
❹ Mod Folder
This view displays the mod folder. Clicking the folder will display the corresponding folders in list view.
You can perform operations related to folders from the mod folder's context menu.
| Context Menu |
Explanation |
| Open Explorer |
Open the right-clicked folder in Explorer. |
| New Mod |
Open a new mod in the right-clicked folder. A creation interface will initiate for the new mod. |
| Create New Folder |
Create a new folder in the right-clicked folder. |
| Rename Folder |
Rename the right-clicked folder. |
| Delete Folder |
Delete the right-clicked folder. This will also delete all mods inside the folder. You will be prompted for confirmation before deletion. |
❺ Mod List View
This is the main mod list view. Mods managed by MOD ORGANIZER are displayed in this view.
The list has the following columns with mod details. Click on a column header to sort by that category.
| Column Header |
Explanation |
| Title |
Name of the mod. |
| Mod Type |
Mod type. For example, if it's a model mod or weapon mod. |
| Type |
Mod subtype. For example, if it's a model mod, it displays information on the mod's target character. |
| Folder |
Name of the folder containing the asset. |
| Visibility* |
Mod's visibility. When it's uploaded to the Steam Workshop, it will display it as "Private," "Friends only," or "Public." If a Mod is not published in the Steam Workshop, it's displayed as "Local." |
| Build Status |
Show whether the mod is being compiled or if compilation was successful. |
| Submission Status* |
Steam Workshop submission status. |
| Explanation |
Mod's explanatory text. |
| Date Created |
Mod's creation date and time. |
| Date Updated |
Mod's revision date and time. |
- *Feature of MOD ORGANIZER for Steam.
❺ a. Mod List View's Context Menu
Right-click on a mod to bring up the Context Menu.
| Context Menu |
Explanation |
| Build |
Compile mod assets to build a mod |
| Submit* |
Submits a selected mod to the Steam Workshop.
You can include release notes listing any changes in the mod. |
| Duplicate |
Copies an existing mod and creates a new one. The folder name of the new mod will be based on the original one plus a number: "_1," "_2," "_3," etc. |
| Delete |
Deletes a mod from the list. You can also delete the asset folder from the disk.
You can also go to the Steam Workshop website to delete the mod from Steam Workshop. |
| Rename Folder |
Changes the folder name. |
| Open Asset Folder |
Opens the asset folder in Explorer. |
| Properties |
Opens the mod's properties window. |
- *Feature of MOD ORGANIZER for Steam.
❺ b. Mod List View - Top Panel
As shown in the following figure, in the upper area of the panel there is a search box, a size adjustment slider, and a Steam Workshop item display check box.
From left to right is the search box, the size adjustment slider, and the Steam Workshop item display check box.
|
Explanation |
| Search Box |
Search for mods based on their name. It essentially works as a filter. |
| Size Adjustment Slider |
Changes the size of the mod list for ease of view. |
Steam Workshop item display
check box* |
If checked, items uploaded to the Steam Workshop will also be displayed on the list. If unchecked, only items that are currently in progress locally will be shown. |
- *Feature of MOD ORGANIZER for Steam.
❻ Type Filter
Use it to display ony mods of a certain type. For example, if you click on character type, only model mods will be listed. Clicking on a blank area to remove the filter. Selecting anything within the folder tree will also remove the filter.
❼ Summary View
Displays information on the selected mod.
When a single mod is selected, a thumbnail image, title, description, and a list of assets to be configured will be displayed. Double-clicking on an asset opens it with the associated application. Currently, MOD ORGANIZER doesn't have an FBX preview function, double-clicking an FBX file opens it in the FBX viewer.
When multiple mods are selected, thumbnails and titles are displayed side by side.
❽ Log View
Displays build logs and information. Information can be scrolled through vertically. You can delete a log by clicking "Log Erase Menu" from the Log View Context Menu.
The Log View has tabs, with build errors shown in the Errors tab.
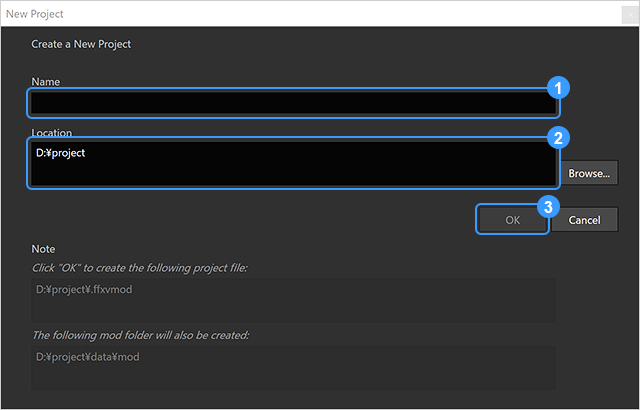
Create a New Project
To create a new project, click the New Project button. Give the project a name and select where to save it in the folder tree.
Note that you do not always need to create a new project as MOD ORGANIZER will open the default project at startup.
❶Enter the project's name. Only alphanumeric characters can be used in folder names.
❷Enter the project's location. Only alphanumeric characters can be used in folder names.
❸Click the button to create a new project.
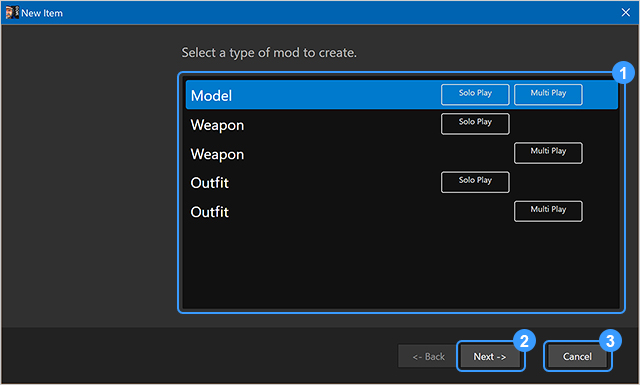
Create a New Mod
Click the New Mod button to create a new mod. The creation wizard will start.
❶Select the mod type, e.g. character, weapon, or costume. This cannot be changed later.
Mod types displayed in the above image may be changed without prior notice.
❷Next step
❸Click the cancel button to quit.
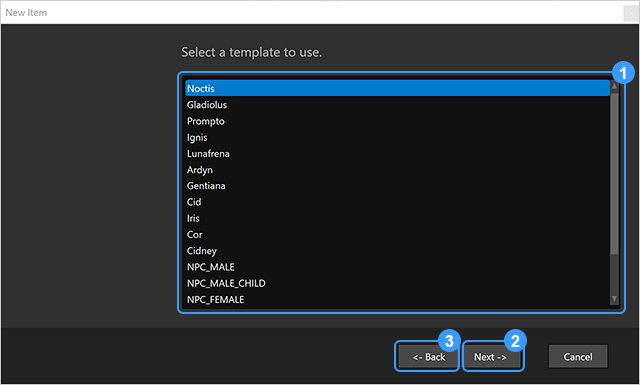
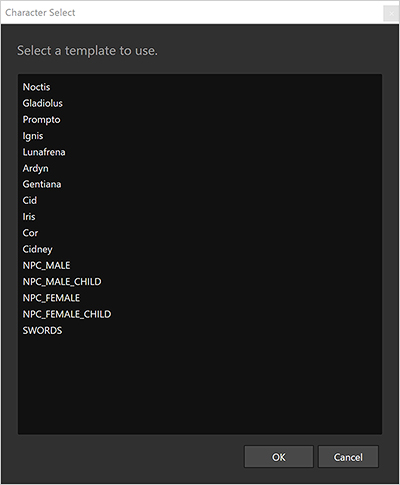
Next, select the mod's application from the template.
❶If it's model mod, select here which character to apply it to.
For model mods, you can select multiple templates and expand the selection range.
To expand the selection, click while holding the Shift key.
Settings can be changed later in the properties window.
The template name in the above image may be changed without prior notice.
❷Next step
❸Click Back to return to the previous step.
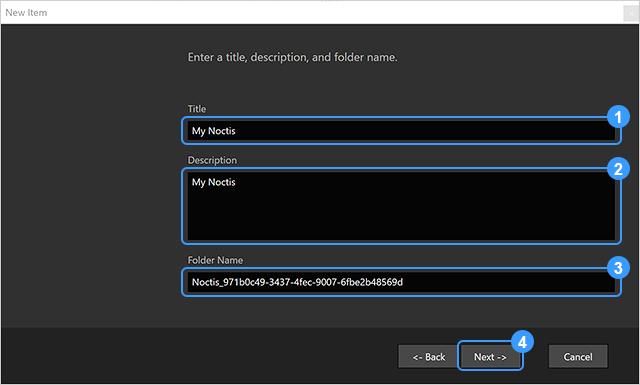
Next, select the title, description, and folder name. All of these can be changed later.
❶Enter the title. The title is to be in the same language as your operating system.
❷Enter explanation text. The explanation text is to be in the same language as your operating system.
❸Enter the folder name. The folder name is to be in the same language as your operating system.
❹Next step
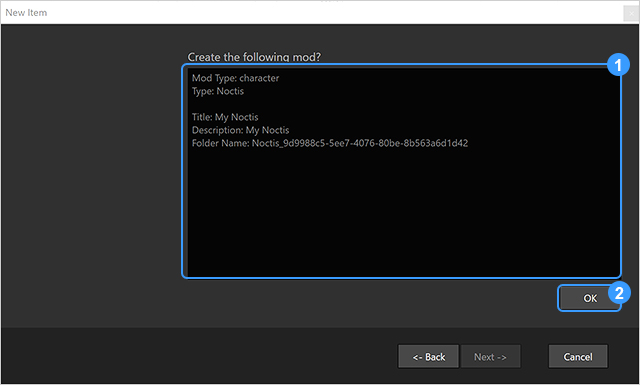
Review the information you entered and click Create.
❶Review the information you entered.
❷Click Create.
A new Mod item will be added to the item list in MOD ORGANIZER.
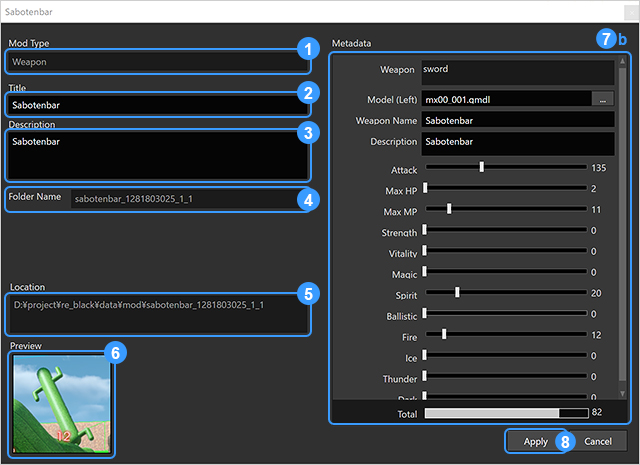
Properties Settings
You can use the properties window to enter and view information such as the model file of a mod and its parameters.
Right-click a mod and select Properties to open the Properties window where you can enter mod details. You can also open the Properties window by double-clicking on the item list.
This is the only window that can specify the FBX model used by a mod.
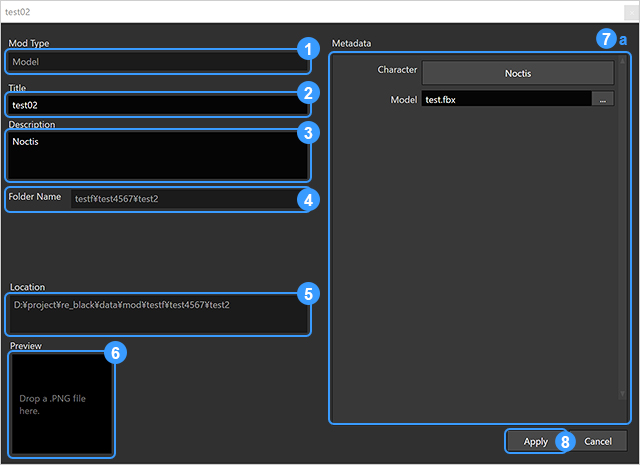
❶View the mod type.
❷View or edit mod name.
❸View or edit mod details.
❹Check the folder name. You cannot change folder names here.
To change a folder's name, select Rename Folder from the mod's Context Menu.
❺Check which folder the mod is saved in.
❻Displays a preview image of the mod.
Drop a PNG file here to set it as the preview image.
The preview image is also displayed in the Steam Workshop.
❼You can view and change mod metadata (parameters).
Data that can be manipulated with metadata varies by mod type.
❼ a.View and change character type mod metadata (parameters).
| Parameters |
Explanation |
| Character Type |
Enter the character type.
When clicked, the window shown below will appear where you can select a character. You can select more than one. |
| Replacement Model |
Specify the replacement model with the FBX file. Clicking the [...] button opens a dialog box where you can select the FBX file. Only one FBX file can be selected.
The FBX file must be placed in the mod folder. Also, all relevant asset files such as textures must also be in the mod folder. This is required to assemble the mod. |
❼ b.View and change single player weapon type mod metadata (parameters).
| Parameters |
Explanation |
| Weapon Type |
Displays the weapon type. Changes cannot be made here. |
| Left Hand Model |
Enter the FBX file of the weapon model to be equipped in the left hand. |
| Right Hand Model |
Enter the FBX file of the weapon model to be equipped in the right hand. |
| Weapon Name |
Enter the weapon name to be displayed in the game. |
| Description |
Enter the weapon's description text to be displayed in the game. |
| Attack |
Enter the weapon's Attack power parameter. |
| Max HP |
Enter the weapon's HP parameter. |
| Max MP |
Enter the weapon's MP parameter. |
| Strength |
Enter the weapon's Strength parameter. |
| Vitality |
Enter the weapon's Vitality parameter. |
| Magic |
Enter the weapon's Magic parameter. |
| Spirit |
Enter the weapon's Spirit parameter. |
| Shot Resistance |
Enter the weapon's Shot Resistance parameter. |
| Fire Resistance |
Enter the weapon's Fire Resistance parameter. |
| Ice Resistance |
Enter the weapon's Ice Resistance parameter. |
| Lightning Resistance |
Enter the weapon's Lightning Resistance parameter. |
| Dark Resistance |
Enter the weapon's Dark Resistance parameter. |
You can edit metadata in other mod types too.
❽Click Apply button to reflect the changes.
Mod Builds and Text
Right-click and open the Build menu. Or check the box for the mod you want to build and select Build from the toolbar to stat the build on the dedicated server. If the compilation is successful, "Success" will be displayed in the item list. If the build fails, check logs for error messages.
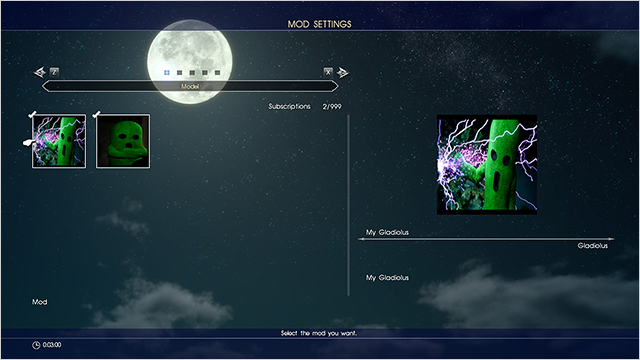
Check the box at the left end of the item list to see it in the game. (As shown below.)
To view the mod in-game, boot he game and load the mod from the in-game mod menu.
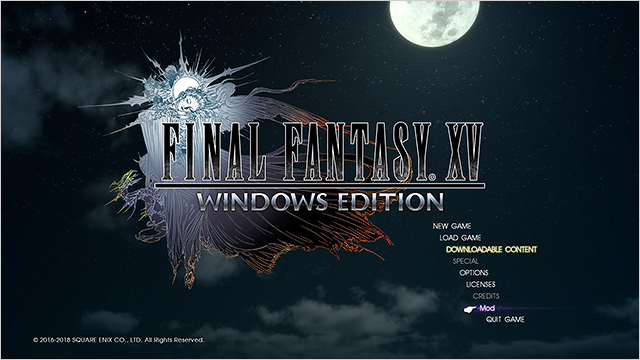
When FINAL FANTASY XV WINDOWS EDITION launches, the Mod Menu will be displayed on the title screen.
You can select mods you want to use in-game in this menu.
To open the Mod Menu from the main menu or during gameplay:
・PlayStation 4 controller: press the OPTIONS button.
・Xbox One controller: press the Menu button.
・Keyboard: press the 0 key.
If you have changed any of your controller or keyboard settings, you can open the Mod Menu with the button assigned to the Pause Menu.
If you make changes in the Mod Menu and apply them during gameplay, you will need to return to the title screen.
Please be aware that if you return to the title screen, any unsaved data may be lost.
Further, there is a maximum number of mods you can apply in-game. The maximum number for each mod category is as follows.
Weapon (Main Game), Weapon (Multiplayer Expansion Pack: Comrades): A total of 100
Armor (Main Game): 50
Models, Armor (Multiplayer Expansion Pack: Comrades): No maximum limit
If you attempt to apply mods that will exceed the maximum limit, they will be displayed on the Mod Menu list but they will not be applied.
Mod Publishing
If using the FINAL FANTASY XV WINDOWS EDITION with Steam, you will be able to upload your mods to the Steam Workshop.
*Feature of MOD ORGANIZER for Steam.
First, log into Steam using the Steam client.
Then start up MOD ORGANIZER to display the Steam Workshop in the status bar and confirm that MOD ORGANIZER is connected to the Steam Workshop.
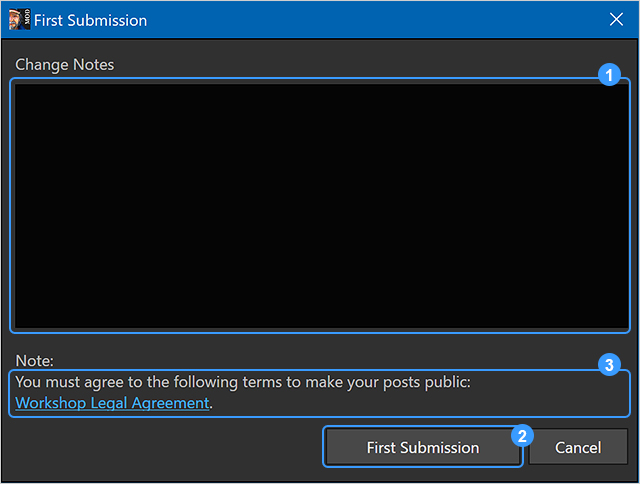
Open the right-click menu and select Submit. The following dialog box will be shown.
❶Enter changelogs.
This is optional.
These notes will be shown on the Steam Workshop website.
They cannot be changed later.
❷Submit the mod. A build will be generated and released.
❸Follow this link to view the Steam Workshop Legal Agreement.
You must agree to the agreement for your mod to be published.
If you have made any revisions to your mod, click Resubmit to release it.
❶Enter changelogs.
This is optional.
These notes will be shown on the Steam Workshop website after submission.
❷Submit the mod. A build will be generated and released.
Delete Mod
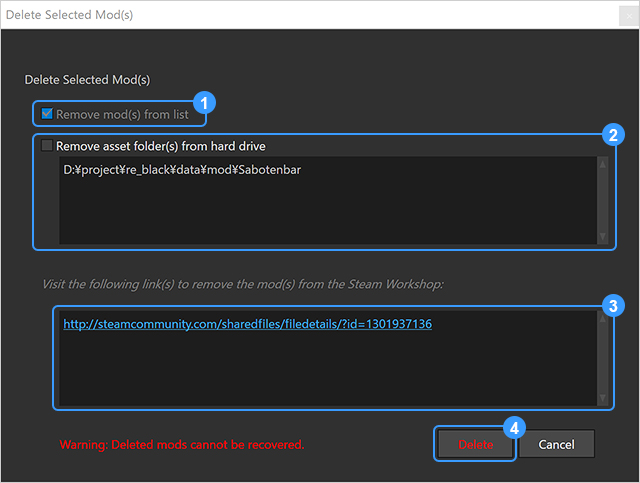
Delete a mod from the Remove menu."Delete from list" is the default option, but you can also delete the asset folders and their contents at the same time.
If you submitted them to the Steam Workshop, you'll need to delete submitted mods from the website. The link to the site will be displayed in the menu.
❶Deletes a mod from the item list. The box cannot be unchecked as it is a default setting.
❷Deletes the asset folders from the disc. This is optional. If this box is checked, models and texture files will also be deleted. Please be careful as you cannot undo this action.
❸You cannot delete submissions to the Steam Workshop directly from the mod tool. To delete them, open the item management page on the Steam Workshop's website. The link provided will be opened by your default web browser.
You can delete submitted mods from the Workshop by clicking the delete button in the item management page.
Note that you must log into your Steam account beforehand in the same web browser.
*Feature of MOD ORGANIZER for Steam.
❹Click the Delete button to delete the mod. This action cannot be undone, so be please consider it carefully.
Grayed Out Mods
Mods which have been deleted from the Steam Workshop website are grayed out in MOD ORGANIZER. This shows that there was a creation folder for the mod uploaded in the past to the Steam Workshop, but it's not present now.
Items uploaded with different accounts will also be displayed as grayed out.
These mods can be returned to local status and deleted. Select "Revert to Local" from the Context Menu.
Duplicating Mods
Select only one mod and click Duplicate in the right-click menu.
The mod will be duplicated. It's copied with its name partially changed. All the working folders are copied.
Duplicates of mods submitted to the Steam Workshop are local-only.